Introduction
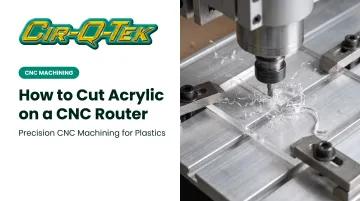
Acrylic (PMMA, also known as plexiglass) has become a go-to material for signage, retail displays, and product prototypes because it cuts cleanly and looks like glass without the weight or fragility. CNC routing is one of the most common ways shops shape it, alongside laser cutting.
But acrylic is deceptively unforgiving. Run the wrong RPM, use a dull bit, or skip proper workholding, and you'll end up with melted edges, chipped corners, or a hazy finish instead of the crisp, glass-like edge the material is known for.
This guide walks through the exact process for cutting acrylic on a CNC router: picking the right bit, dialing in feeds and speeds, securing the sheet, and troubleshooting the problems that trip up even experienced machinists. We'll also cover when it makes more sense to outsource the job to a precision CNC machining partner rather than run it in-house.
Key Takeaways
- A single-flute O-flute carbide bit paired with correct RPM/feed keeps edges clear and prevents melting
- Cast acrylic machines more predictably than extruded sheet, which is more prone to gumming and stress marks
- Ramped tool entry and steady chip evacuation matter more for acrylic than for wood or MDF
- Nearly every quality problem traces back to a dull bit, mismatched feed/speed, or loose workholding
- Tight-tolerance or high-volume acrylic parts often perform better through a specialized CNC machining partner
How to Cut Acrylic on a CNC Router: Step-by-Step Guide
Cutting acrylic well depends on a full setup sequence. Skip a step, like checking bit sharpness or securing the sheet properly, and the rest of your setup won't save you.
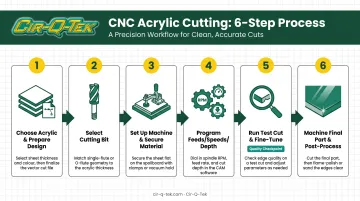
Step 1: Choose the Right Acrylic and Prepare Your Design
Not all acrylic sheet behaves the same way under a router bit.
- Cast acrylic is produced in individual sheets and generally machines more cleanly, making it the preferred choice for CNC work
- Extruded acrylic is more budget-friendly but is more sensitive to heat and can gum up or show stress marks if your feeds and speeds aren't dialed in
- In your CAD file, avoid sharp internal corners: they concentrate stress and invite cracking. Add fillets that roughly match your bit's radius
- Leave the factory protective film in place during machining. It's cheap insurance against scratches from clamps, chips, and dust collection hoses
Step 2: Select the Right Cutting Bit
Bit choice determines whether your edges come out clear or cloudy.
- Use a single-flute or spiral O-flute carbide end mill for through-cuts—the open flute lets chips clear cleanly instead of packing in and building heat
- Save 60° V-carving bits for engraving lettering or logos, not for cutting through material — they're the wrong geometry for chip clearance on a full-depth cut
- Check bit sharpness before every job. A dull edge is one of the most common causes of melted or hazy edges, and it's often overlooked because the bit "looks fine"
Step 3: Set Up the Machine and Secure the Material
Acrylic sheet, especially anything under 1/4", flexes like a drum skin if it isn't held down properly.
- Use a sacrificial spoil board (MDF works well) under the sheet
- Secure the material with clamps, double-sided tape, or a vacuum table — vacuum hold-down is the most common method in production shops
- Note: aggressive dust collection can occasionally overpower vacuum hold-down on small or lightweight parts, so verify nothing shifts before running the full job
- Run a quick calibration check: confirm spindle runout, tool offsets, and that your dust extraction or air-assist is actually working before you hit start
Step 4: Program Feeds, Speeds, and Depth of Cut
This is where most acrylic jobs succeed or fail.
Starting ranges for O-flute carbide bits (validate per your machine and bit diameter with a test cut):
| Bit Diameter | RPM | Feed Rate |
|---|---|---|
| 1/8"–3/16" | 18,000–20,000 | 100–200 IPM |
| 1/4"–1/2" | 16,000–18,000 | 100–300 IPM |
These figures come from ACRYLITE's fabrication guidance for CNC routing and should be treated as a starting point, not a fixed rule.
For depth of cut, many shops start around half the bit's diameter per pass and adjust based on chip behavior. Going deeper increases tool deflection and heat; shallow passes waste time and can cause rubbing.
Use a ramped entry rather than a straight plunge. It reduces the shock that causes chipping at the entry point.
Step 5: Run a Test Cut and Fine-Tune
Never go straight to your final part.
- Cut a scrap piece using your programmed settings
- Look at the chips: clean, curled chips mean your feed/speed combination is working
- Stringy, melted, or fused chips mean you need to adjust — usually by increasing feed rate or improving chip evacuation
Step 6: Machine the Final Part and Post-Process
Run the toolpath and inspect the edge immediately while the part is still on the table — it's much easier to catch a problem before you unclamp.
For optical clarity, post-processing options include:
- Progressive sanding — start around 180–240 grit for machine marks, work up to 400–600 grit for a smooth surface
- Buffing — a cutting compound followed by a high-luster compound restores shine without heat
- Flame or vapor polishing — produces a glass-clear edge but requires care, since rapid heating can induce stress; annealing afterward helps prevent later crazing
Key Parameters That Affect Your Acrylic Cutting Results
Acrylic has a much narrower "sweet spot" than wood. A small change in RPM or feed can be the difference between a clean edge and a melted one.
| Parameter | Why It Matters | Impact on Quality |
|---|---|---|
| Spindle RPM | Too low causes rubbing and heat; too high without matching feed does the same | Deviations show up as frosted or melted edges, especially with small-diameter bits |
| Feed Rate | Controls material removal relative to spindle speed: the goal is to cut, not rub | Feed must scale with bit diameter; too slow builds heat, too fast causes chipping |
| Depth of Cut | Excessive depth raises deflection and heat; too shallow causes repeated rubbing | Roughly half the bit diameter per pass is a common starting point, adjusted for sheet thickness |
| Tool Type & Sharpness | Flute geometry determines how efficiently chips clear the cut | Single-flute O-flute bits outperform multi-flute bits for cool, clean cuts |
| Chip Evacuation & Cooling | Trapped chips re-cut and generate localized heat | Compressed air, dust extraction, or light coolant mist keeps the kerf clear and cool |
ACRYLITE's fabrication data puts the optimum chip load in the 0.004–0.015 in/tooth range. The low end favors finish; the high end favors speed at the cost of some surface quality.
Common Mistakes and Troubleshooting When Cutting Acrylic on a CNC Router
Even seasoned machinists run into acrylic-specific problems. Most of those problems share a handful of root causes.
| Problem | Likely Cause | What to Check or Adjust |
|---|---|---|
| Melted or frosted edges | Excess RPM relative to feed, dull bit, or poor chip clearing | Increase feed rate, swap in a sharp O-flute bit, improve air-assist or dust extraction |
| Chipping or cracking at corners | Straight plunge entry, sharp internal corners, or too much tool engagement | Use ramped entry, add corner fillets in your design, reduce stepover |
| Part shifts or vibrates mid-cut | Weak clamps/tape or an unsecured spoil board | Use a vacuum table or well-taped MDF backer; check for flex before cutting |
| Cloudy or hazy finish | Microscopic marks from a worn bit or inconsistent feed | Replace the bit, stabilize feed rate, and polish (sand, flame, or vapor) if clarity is required |
When CNC Routing Makes Sense vs. Alternatives for Cutting Acrylic
A CNC router isn't always the right call depending on volume, tolerance, and part geometry.
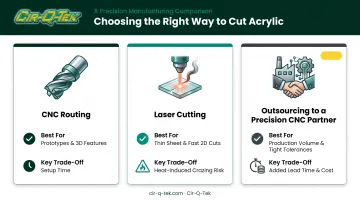
CNC routing is a strong fit for one-off signage, prototypes, and moderate-volume runs, especially when you need pockets, engraving, or 3D contours that a laser simply can't produce.
Alternative Method: Laser Cutting
- When it's better: thin sheets, high-speed 2D cutting, intricate small details
- Key trade-offs: Heat-induced stress and crazing can weaken laser-cut edges compared with a mechanically routed cut
Alternative Method: Outsourcing to a Precision CNC Machining Partner
- When it's better: production-volume orders, tight-tolerance requirements, or when in-house equipment or expertise isn't available
- Key trade-offs: added lead time and per-part cost are usually offset by consistent quality and no capital outlay on machines or tooling
For shops that choose to outsource, a precision partner can close the gap on tolerance and capacity. Cir-Q-Tek's CNC machining holds tolerances as close as ±0.0005" on engineered plastics and other materials, with multi-axis equipment and CAD/CAM programming for repeatable runs.
Work moves through ISO 9001, ISO 13485, and IATF 16949-certified facilities, plus a secondary inspection at the Pennsylvania site before shipment. Non-conforming parts are replaced at no extra cost—often the deciding factor between keeping an acrylic job in-house and sending it out.
Conclusion
Clean acrylic cuts come down to three things: the right bit, correctly tuned feeds and speeds, and workholding that doesn't let the sheet move or flex. Most failures trace back to skipped prep (a dull bit, a rushed clamp job) rather than any shortcoming in the machine itself.
For hobby work and one-off signage, a well-tuned router does the job. For production-grade or tight-tolerance acrylic parts, a precision CNC partner such as Cir-Q-Tek is usually the smarter route.
Frequently Asked Questions
Can a CNC machine cut acrylic?
Yes. CNC routers and mills cut acrylic effectively when set up with the right bit, RPM, and feed rate, producing clean edges and complex geometries that would be difficult with hand tools.
What is the best router bit for cutting acrylic?
A single-flute or spiral O-flute carbide end mill is best for through-cuts, since its open flute clears chips and reduces heat. A 60° V-bit is better suited for engraving lettering or logos.
What RPM and feed rate should I use for acrylic on a CNC router?
A common starting point is 16,000–20,000 RPM with 100–300 IPM, depending on bit diameter. Always validate with a test cut on scrap material before running your final part.
Why does acrylic melt when cutting on a CNC router?
Melting usually comes from excess heat caused by a feed rate that's too slow, a dull bit, or poor chip evacuation. Fixing any of these three usually resolves the issue.
Is CNC routing better than laser cutting for acrylic?
CNC routing avoids the heat-affected edges and potential crazing that laser cutting can introduce, and it supports 3D features like pockets and contours that lasers can't produce. Laser cutting still wins for fast, intricate 2D cuts on thin sheet.
Can you cut thick acrylic sheets on a CNC router?
Yes. Thicker sheets need multiple shallower passes, a larger-diameter bit, and adjusted feed/speed settings to manage heat buildup and avoid tool deflection.